
When every square foot counts, the shower becomes a critical design decision in a tiny home. A poorly planned bathroom can eat up precious space and leave you feeling cramped: a smart one actually enhances the home’s functionality and livability. Modern shower solutions for compact spaces have evolved far beyond the awkward stall-in-the-corner approach. Today’s tiny home owners have genuine options, corner showers, wet rooms, compact fixtures, and clever storage strategies that deliver comfort without waste. This guide walks through practical designs, installation approaches, and material choices that work for tiny spaces.
Table of Contents
ToggleKey Takeaways
- A tiny home shower is a critical design decision that can significantly improve functionality and livability when planned thoughtfully rather than squeezed into leftover space.
- Corner showers measuring 32×32 or 36×36 inches maximize vertical space and are the ideal workhorse solution for tiny homes, requiring minimal plumbing runs and wall penetration.
- Wet room concepts eliminate shower partitions entirely, making the bathroom feel larger and more open while requiring precise slope (1:40 ratio), full waterproofing, and strong ventilation to prevent moisture damage.
- Proper waterproofing with cement board, waterproofing membrane, and quality caulk is non-negotiable in tiny home shower installation—skipping these steps leads to costly water damage and structural problems.
- A DIY corner shower install costs $1,500–$3,500 when using mid-range materials, while professional installation ranges $2,000–$5,000, making upfront investment in design and materials a long-term asset rather than a cost-cutting shortcut.
- Recessed niches, wall-mounted storage, and 50–80 CFM exhaust fans are essential for maximizing space and preventing mold in tiny home bathrooms.
Why Shower Design Matters in Tiny Homes
A shower isn’t just plumbing, it’s often the largest wet appliance in a tiny home’s footprint. In homes under 400 square feet, the bathroom may account for 20% of usable living space, so every inch matters. A standard full-size shower stall (36×36 inches or 36×48 inches) consumes real estate fast. Poor drainage, inadequate ventilation, or tight access can make daily routines frustrating and create moisture problems that damage walls and framing.
Conversely, a well-designed compact shower solves multiple problems at once. It keeps plumbing runs short (saving money and complexity), maintains headroom in adjacent spaces, and often requires less ventilation tonnage. Thoughtful layouts also prevent the “water everywhere” chaos that comes with undersized or poorly sloped showers. Owners who invest upfront in design, rather than cramming a standard fixture into leftover space, enjoy years of trouble-free use and actually want to spend time in their bathroom.
Maximizing Vertical Space With Corner Showers
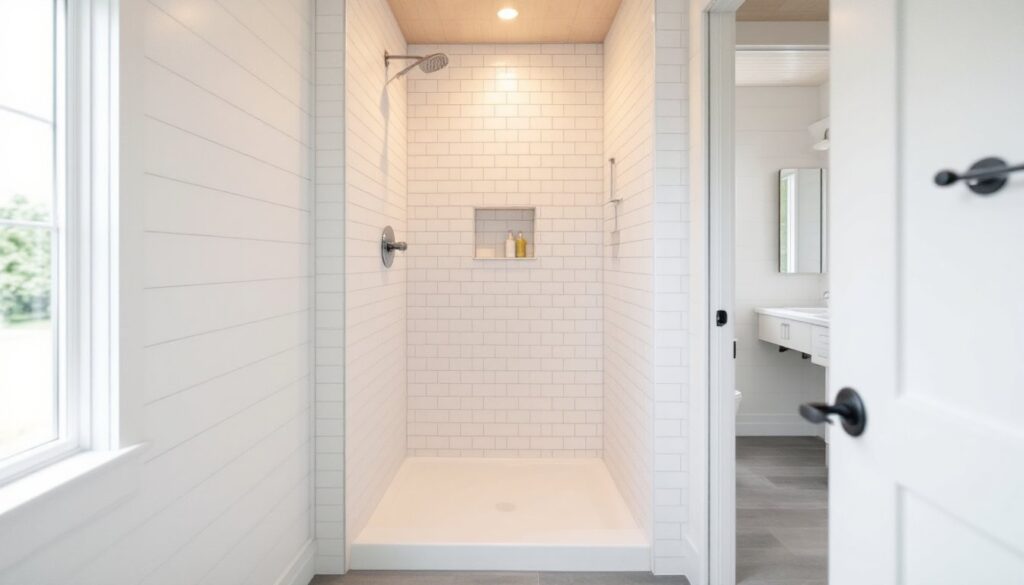
Corner showers are the tiny home workhorse. By anchoring to two walls instead of eating into open floor, they reclaim valuable floorspace for the rest of the bathroom. A 32×32-inch corner stall (the smallest viable size for a single adult) fits snugly: a 36×36-inch corner unit offers modest elbow room. Both require minimal wall penetration and plumbing runs.
Preformed shower pans (also called shower bases or shower trays) come in fiberglass, acrylic, or cast polymer. Fiberglass is lightweight and affordable but prone to crazing over time: acrylic holds up better and is easier to repair: cast polymer resists staining and impacts, though it costs more upfront. For a tiny home, a lightweight acrylic pan keeps installation simple, no reinforcing joists or extra framing, and cuts installation labor.
Wall material options vary. Ceramic tile is durable and fully customizable but requires proper substrate (cement board or hardie backer) and careful waterproofing: it’s also slower to install. Acrylic shower surrounds (three-piece or one-piece molded units) slip over the pan quickly and require minimal sealing. Fiberglass surrounds are the budget option but show wear faster in high-moisture environments. For true durability on a budget, hybrid approaches work: install solid acrylic or polymer panels from floor to 4 feet, then tile above for visual interest.
Compact Fixtures and Space-Efficient Layouts
Showerheads in tiny spaces don’t need to be tiny, comfort matters even when square footage doesn’t. Standard 2.5 GPM (gallons per minute) showerheads deliver a full spray without feeling anemic. Wall-mounted units save corner shelf space: recessed niches hold soap and shampoo without eating into the stall width. A single-handle valve occupies less wall real estate than separate hot and cold controls and reduces plumbing complexity during installation. Expect to spend $60–$150 on a solid cartridge valve that won’t leak after years of use: cheap valves cost half that but fail sooner.
Wet Room Concepts for Minimal Footprints
A wet room, a fully waterproofed bathroom where the shower occupies the entire floor, eliminates the shower stall altogether. Water drains via a sloped floor and linear drain (or strategically placed floor drain), so you step out of the shower directly into the bathroom. This approach works brilliantly in tiny homes because there’s no partition between shower and bathroom: visually and functionally, the space feels larger.
Wet rooms require discipline. The entire floor must slope toward the drain, typically a 1:40 ratio, meaning 1 inch of rise for every 40 inches of horizontal run. Underlayment must be waterproof: options include pre-sloped bases (modern and code-friendly but pricier) or traditional mud-bed slopes (labor-intensive but proven). Walls must be sealed 6 feet high with a commercial waterproofing membrane: small corners and seams are critical failure points.
The payoff: a tiny bathroom gains flexibility. No shower door or curtain to maintain, no mold-prone corners, and the floor feels open. Ventilation is critical, plan for 60–80 CFM (cubic feet per minute) capacity from your exhaust fan. Without good air movement, moisture lingers and causes problems with cabinetry and adjacent walls. Wet rooms also demand precise plumbing: slope and drain placement can’t be improvised. This is a project where professional consultation or full professional installation is wise, especially if building codes in your jurisdiction have specific wet room requirements.
DIY Shower Installation Tips for Tiny Spaces
Installing a corner shower or compact stall in a tiny home is achievable as a DIY project if you’re comfortable with basic plumbing and tile work. The difference between success and failure usually comes down to three things: prep work, waterproofing, and slopes.
Before you build, confirm your plumbing rough-in dimensions. The drain line must slope at 1/4 inch per linear foot toward the main stack, non-negotiable. If your tiny home’s framing is tight or the floor is uneven, sloped drain lines may be impossible without major modification. A plumber’s consultation (often $100–$200) upfront saves costly mistakes later. Also check building codes in your jurisdiction: some areas require licensed plumbers for structural shower work, others don’t.
For the base, a preformed pan is faster and safer than custom mud-bedding. Set it on a solid, level surface: use shims if needed. Seal the flange where the pan meets the wall with silicone or polyurethane caulk (not regular caulk, it cracks and fails). This joint is your primary defense against water intrusion.
Wall prep is where corners get cut and problems start. Install cement board or Hardie backer, never drywall, as the substrate. Screw it directly to studs on 16-inch centers. Tape all seams and screw holes with waterproofing tape, then apply a full-surface waterproofing membrane (brush-on or sheet-applied). Yes, this adds labor and cost: no, you can’t skip it. Once the membrane is set, tile or finish as planned.
Safety matters: wear safety glasses when cutting tile or working overhead, gloves when handling adhesives and sealers, and a dust mask when mixing thin-set or grout. Ensure adequate ventilation, crack a window or run a fan. If you’re uncertain about any plumbing or structural aspect, bring in a professional rather than guess.
Materials and Storage Solutions That Work
Material choices in a tiny home shower compound over time. Cheap materials feel cheap, leak, and require replacement: mid-range selections balance durability and cost. For a 300-square-foot bathroom, expect to spend roughly $1,500–$3,500 on a corner shower install (pan, surround, valve, and basic tile), depending on finishes and regional labor rates. Professional installation typically costs $2,000–$5,000.
Fiberglass and acrylic surrounds cost $300–$800: cement board, waterproofing, tile, and labor add another $1,000–$2,000. A fully custom tile shower runs higher. Preformed units are faster and predictable: custom builds offer design flexibility but require skill.
Storage in a tiny bathroom shower demands creativity. Recessed niches (carved into wall framing before drywalling) save precious corner space and cost $50–$150 in materials if DIY-installed. Corner shelves or tension rods between studs hold lightweight items. Magnetic strips (usually found in kitchen areas) stick to tile and hold metal grooming tools. Outside the shower, wall-mounted cabinets above the toilet or beside the sink multiply storage without eating floor space. In tight layouts, a corner pedestal sink (18 inches deep) edges out a vanity and keeps the floor open.
Ventilation fans are non-negotiable. A 50–80 CFM exhaust fan sized to your bathroom’s square footage prevents mold and moisture damage. Ductwork should run to the outdoors, not into an attic (humid air in the attic = wood rot). Apartment Therapy and Houzz offer real-world tiny home tours showing storage strategies and design approaches that work in constrained spaces. For inspiration on sustainable tiny home design including compact bathrooms, DIY tiny home builds show how experienced builders balance function and minimal footprint.
Conclusion
A compact shower doesn’t mean compromising on comfort or durability. Corner stalls, wet rooms, and space-smart fixtures deliver real functionality when designed and installed thoughtfully. The key is planning upfront, confirm plumbing routes, waterproof properly, and don’t skip surface prep. Whether you’re installing a preformed unit yourself or hiring a professional, treat the shower as a long-term investment rather than a corner to cut. A well-executed tiny home shower becomes one of the space’s genuine assets, not a cramped afterthought.